Muddaritaville Stencil by Funky Junk: Chevron Christmas Tree
Muddaritaville Stencil by Funky Junk: Chevron Christmas Tree
Restyled Decor
Couldn't load pickup availability
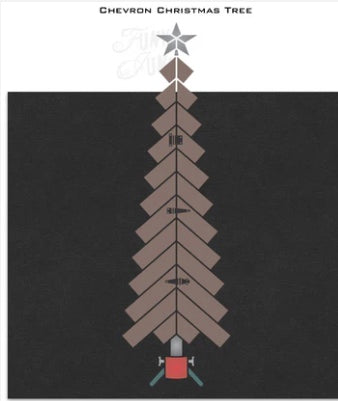
FJ168 Funky Junk's Chevron Christmas Tree stencil
Enhance your holiday decor rustic-style with our FJ168 Chevron Christmas Tree stencil! Create a unique rustic wood tree with images of a metal star, retro tree stand, and wood plank body, designed to fit 1.5" real wood strips if desired! Complete with rusty junk hinges, it will make the perfect wood Christmas tree vertical porch sign with a quirky touch!
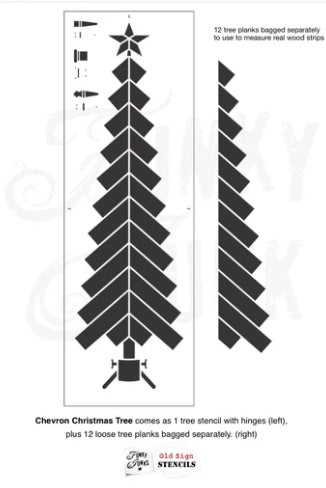
Included:
- 1 tall tree stencil
- Separate bag of 12 loose plank stencils (one side of the tree body) to measure real wood planks if desired
- 3 hinges designed with nail overlays
Options:
The plank tree body is designed so you have the ability to add real cedar strips for branches. Real wood pieces are not included with this stencil.
- Total tree stencil image: 9.8"w x 33.25" tall
- Plank images measure: 1.4" wide x 2"-6.5" long
- Longest hinge measures 2.2" long
What you get:
-
Chevron Christmas Tree FJ168 is a 13-piece reusable mylar stencil package. The tree/hinges come as one piece, plus 12 loose board-shaped stencils packaged in a separate bag you can use to measure real wood if desired. Real wood pieces are not included.
How to use this stencil:
- Stencil the entire tree image as desired, going very lightly over the wood body, if you desire to cover it with real wood planks.
- If you desire to use real wood pieces, use the plank stencils to measure, then cut wood to the appropriate lengths twice, to create both sides of the tree. Then hot glue into place.
- Stencil hinges over the tree body where desired, then reposition and stencil the nails on top. For easier maneuvering, consider cutting the combined hinges into their own stencil sheet separate from the tree.
Wood suggestions:
The wood plank areas measure 1.4" x 2" through 6.5" long. Try using:
- 1.4" - 1.5" cedar strips
- wood shims
- vintage wooden yardsticks (rulers)
Stencil Features:
- Made with reusable, high-quality 10 mil mylar
- Added registration marks for easy positioning
Project Ideas:
Tools:
-
Miter saw
-
Orbital sander
-
Cordless drill
Supplies:
- Chevron Christmas tree stencil
- Wood Christmas Tree in Crate stencil
- Wood planks to create backdrop - 16" x 49"
- 2 wood strips for support - 1.5" x 16"
- Random scrap wood for presents
- Fusion Mineral Paint in Ash
- Dome tip stencil brush
- Wider paint brush like this Palm Pro
- Glue gun
- String or twine
- Fairy lights
Instructions:
Preparing the sign boards
-
Cut sign boards longer and wider than the stencil image.
-
Paint the cut boards black.
-
Support the boards by screwing in two 1.5 wood strips along the top and bottom.
Wood strips
-
Place each mini stencil strip onto a 1.5 cedar strip, then trace each one twice.
-
Cut the wood strips with a miter saw, ensuring the angled cuts are all the same degree.
Stenciling
-
Center the Chevron Christmas Tree stencil in the center of the boards.
-
Stencil the tree star and tree stand as desired.
-
Gently swipe the stencil brush along the spine of the tree to create a light impression for the future cedar strip placements.
Hot gluing
-
Hot glue each wood strip to the tree.
-
If you made wood block presents, decorate, then hot glue into place.
-
Glue on any kinds of decor you wish.
Fairy Lights
-
Drill a small hole at the bottom of the tree where you wish for the lights to start.
-
Feed the light string through the back, then place along the tree where desired. I held mine to the tree with screws acting as ornaments.
Notes